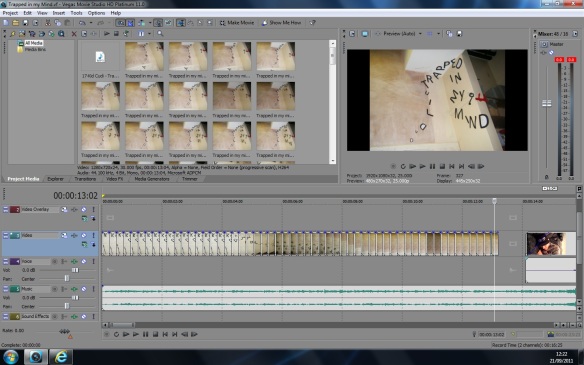
On the 21st September we all began to edit the still shots to add movement in time with the music. The still shot also had to move in a special time which will make it easy for the audience to spot the artist and song title within the lettering. The benefit of placing each of the filming shots that we have produced so far, is so we can look careful at what shots are we dont want to use and the shots that were successful. Once all the desired shots are selected we began to put the shots in potential places of the song, so the lips syncing of Dom matched the song lyrics in harmony. Then with the blank spaces where there aren’t any shots in place, we listening to the song and looked careful at the editing and work out where the lyrics are needed. So we did a lyric analysis and compared the sheet of lyrics to the scene we have chosen. then when it comes to the next day of filming we can easily get Dom and will immediately know what part of the song he needs to sing and where it will be place. Not only will it help us and dom know when to sing, it will also indicate how long we need to re-film the shots and how long dom will need to lip sing for.
Monthly Archives: September 2011
Editing Special After Effects….
Colour Correction / Grading:
“Color grading or colour painting, is the process of altering and enhancing the color of a motion picture, video image, or still image either electronically, photo-chemically or digitally. The photo-chemical process is also referred to as color timing and is typically performed at a photographic laboratory. Modern color correction, whether for theatrical film, video distribution, or print is generally done digitally in a color suite. Considering such achievements in digital imaging, the artist has the ability to “paint” the image, thus the names “colorist” or “color painter” have become most applicable.”
“Color correction by using color gels, or filters, is a process used in stage lighting, photography, television, cinematography and other disciplines, the intention of which is to alter the overall color of the light; typically the light color is measured on a scale known as color temperature, as well as along a green–magenta axis orthogonal to the color temperature axis.”
Cloning / Layering:
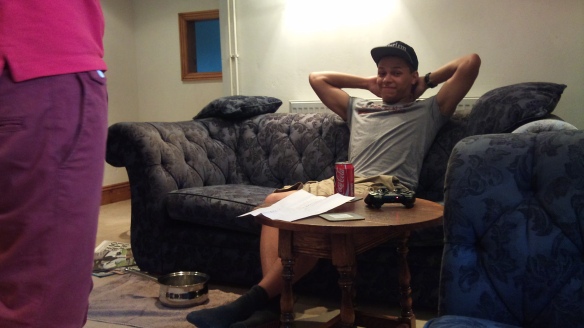
This is a prime example of the cloning/layering technique used in our music video. We kept the camera in the same position and just moved the actor around in the room, layering both shots on top of each other, creating them both in the same shot. However problem with this, there is a different in lighting of each corner of the room, creating a visible line down the center of the shot; showing where the layer has been placed.
Still Motion:
“Slow motion (commonly abbreviated as slowmo) is an effect in film-making whereby time appears to be slowed down. It was invented by the Austrian priest August Musger.
Typically this style is achieved when each film frame is captured at a rate much faster than it will be played back. When replayed at normal speed, time appears to be moving more slowly. The technical term for slow motion is overcranking which refers to the concept of cranking a handcranked camera at a faster rate than normal (i.e. faster than 24 frames per second). Slow motion can also be achieved by playing normally recorded footage at a slower speed. This technique is more often applied to video subjected to instant replay, than to film. High-speed photography is a more sophisticated technique that uses specialized equipment to record fast phenomena, usually for scientific applications.
Slow motion is ubiquitous in modern filmmaking. It is used by a diverse range of directors to achieve diverse effects. Some classic subjects of slow motion include:
- Athletic activities of all kinds, to demonstrate skill and style.
- To recapture a key moment in an athletic game, typically shown as a replay.
- Natural phenomena, such as a drop of water hitting a glass “
Fading / Dissolve:
“In the post-production process of film editing and video editing, a dissolve is a gradual transition from one image to another. The terms fade-outand fade-in and are used to describe a transition to and from a blank image. This is in contrast to a cut where there is no such transition. A dissolve effectively overlaps two clips for the duration of the effect. The lengths of the two scenes can be adjusted by trimming, which, if desired, can change the original durations of the scenes before the dissolve was added.”
Here is an example founded on ‘YouTube’ on the different types of dissolving techniques available and their technical terms:
Editing software
To create my filming into a finished piece, I will be going to use “Sony Vegas”.

What is Sony Vegas?
“Sony Vegas is a professional video editing software package for non-linear editing systems (NLE) originally published by Sonic Foundry, now owned and run by Sony Creative Software. Originally developed as an audio editor, it eventually developed into an NLE for video and audio from version 2.0. Vegas features real-time multitrack video and audio editing on unlimited tracks, resolution-independent video sequencing, complex effects and compositing tools, 24-bit/192 kHz audio support, VST and DirectX plug-in effect support, and Dolby Digital surround sound mixing. It runs on Microsoft Windows XP (XP x64 not supported) , Vista and 7. In April 2007, Sony along with AMD jointly demonstrated a 64-bit version of Vegas running on 64-bit Vista.”
From my previous experience with Song Vegas over the last year, I have developed a greater understanding of how to navigate and function Vegas pro 10 and strongly believe its the most professional software to use, which will allow us to be more creative with the movements, effects and transitions. It has also been really useful for our AS A Level project which gave us the ability to product a good quality piece of work in high definition (HD). Therefore this is the reason why we shall be going to use the updated version of Sony Vegas as this will be best suited for our media product.
The other editing software’s out there are harder to gain reach or were too simple/basic, minimizing the chance to show our creativity and ideas. As the more simple and easy software’s to use aren’t as functionally complex as we required.
Filming Day Two…
On the 4th September 10:30am we all decided to meet up in Glinton to prepare of filming, as it was the only day where everyone was off work and free to do some work. We first had some problems with the choice of actor as Joey Yeboah was meant to be the main actor, staring the role of Kid Cudi, then we asked a few other people who had potential to replace Joey due to him being slightly un-reliable, as he is working within a different group. Therefore I kindly suggested to Modey to ask his mate Dom Bennett who was a previous media student at AMVC in 2009. Luckily Dom agreed to take the role of Kid Cudi and met us all up in Glinton. Around 11:00am we all check if the equipment was fully charged and all props were accessible if needed. We all walked down to school to check if it would be open on a Sunday! Which it wasn’t, however this didn’t stop us from filming as we went to the local shop in Glinton to buy some Coco-cola as we knew we would need to use this at some point of the day.
Then we walked to Pekirk as this was one of our chosen locations, decided in our location report. We eventually found the alleyway which we wanted to film in. We successfully got permission to film in between the houses if we weren’t going to disturb anyone. After 15 mins later we created approximately 12 shots of Dom Bennett walking down the alleyway towards the bright light. This look extremely effective and exactly how I imagined it, as he looks really dark like a tall shadow walking towards the light. We also wanted to experiment with the use of shots, as we wasn’t sure how long we had Dom Bennett for and the lighting would change if we didn’t get it done in time, as i was really fond of the lighting, creating a glowing, dull type of natural lighting.
 After all the filming in Pekirk was finished we walked back to Sam’s house to do the filming in the room and the shot where we advertise the coca-cola bottle in an unique way, by experimenting with the camera movement. We felt that using a flip camera would be the easiest technology to use when filming this complex shot that took a lot of time to get “near to perfect”. The type of camera movements that we were aiming for today was very difficult as the tri-pod didn’t come into use as the shots we needed to create could only be done by hand held. This did give us a lot of pressure as we didn’t want to make the camera look shaky when it comes to the editorial stages of the construction and production.
As we suddenly needed to use Dom Bennett as our main actor there was a lot of pressure on him to get the lip syncing perfect. I knew this was going to be a massive problem to whoever our actor was going to be, due to the song being extremely unknown. However, we strongly felt like we needed a song that wasn’t going to be compared to an official video by the same artist. Therefore we put Dom into the deep end and asked him to learn the lyrics to the shot we needed from him. To help it out a bit we played the song in the back ground so he can get the lips in the correct time and place, to make the video appear more natural. This was very hard and time consuming. Lip syncing was made really easy in our preliminary as we had a natural born singer who knew the lyrics of the Jazon Maraz song by heart. So filming today became very stressful and frustrating, however we still motivated Dom with the singing and produced some good effective shots.
Overall I felt that today was successful and we have managed to produce some really good camera angles and shots. Domic was a very good actor when he gained confidence with the whole surreal environment and unique shots, and the lighting was at our advantage today as the weather was raining and dull just how we wanted it to be. More dull and surreal when he is trapped and brighter colours and shots when he is in the ‘real world’.

